

3.7m STARTER ZIP POLE KIT OF 4
$489.49 Excl. GST
3.7m STARTER KIT
Ideal for professional contractors – both commercial and residential
PRODUCT DETAILS
The ZipWall® 3.7m Starter Kit (4 Pack) is a premium spring-loaded dust barrier system designed for professional contractors who need fast, reliable dust containment on site. Built from anodised aluminium, these poles are lightweight, strong, and engineered for repeated use across residential and commercial projects.
With a tool-free setup and innovative non-marking head system, you can create a tight dust barrier in minutes—without ladders, tape, or surface damage. Ideal for maintaining clean, controlled environments during renovations, fit-outs, and construction work.
Key Features & Benefits
- Spring-loaded design – Fast, safe setup with no ladder required
- Extends up to 3.7m – Adjustable for high ceilings (from 1.4m)
- Anodised aluminium poles – Stronger, smoother, and more durable
- Non-skid, non-marking heads – Secure grip without surface damage
- Lightweight design – Each pole weighs approx. 0.9kg
- GripDisks™ included – Helps prevent sliding on smooth floors
- Reusable system – Built for heavy-duty, repeated use
- Compatible with air systems – Suitable for positive & negative air setups
- Supports compliance – Assists with EPA RRP dust control guidelines
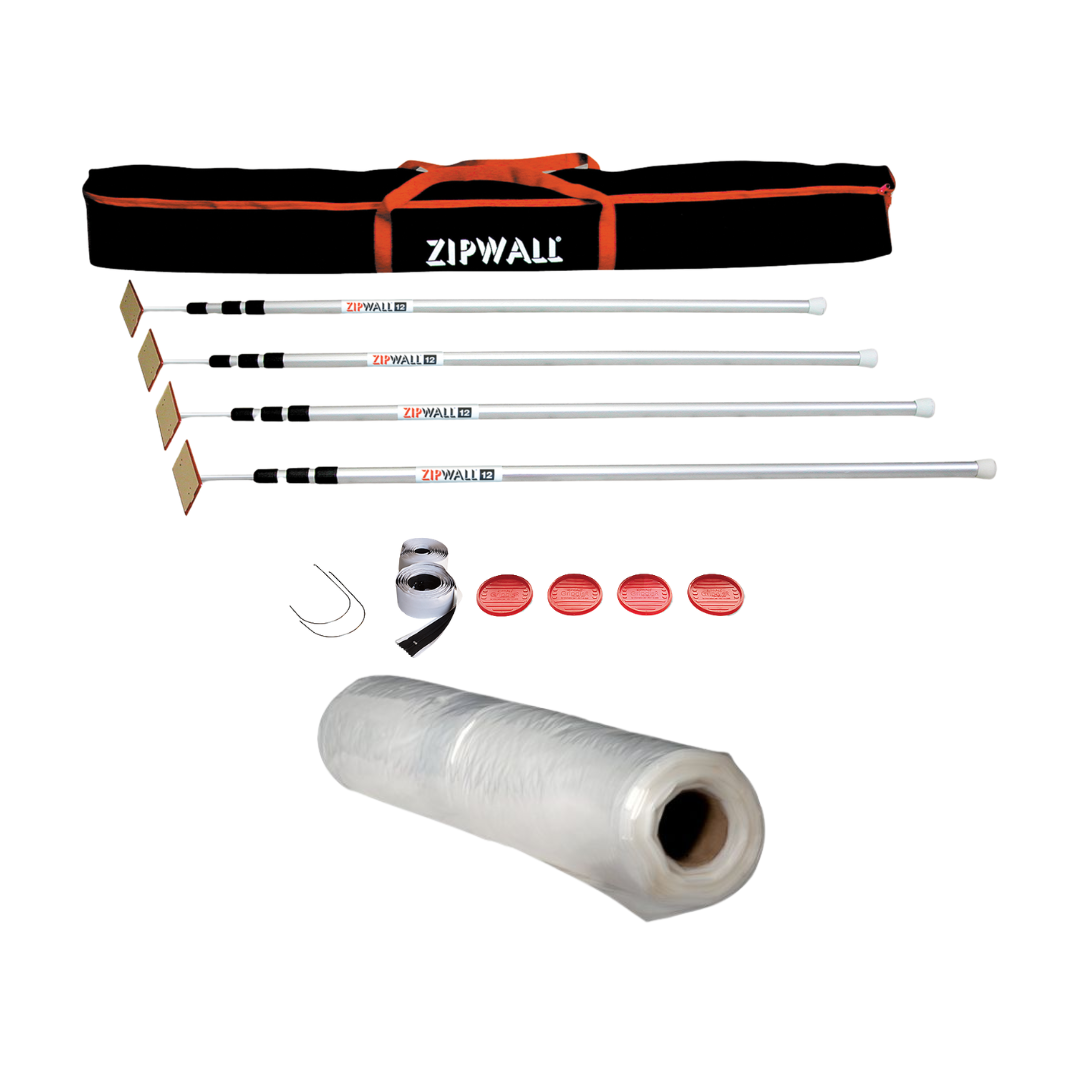
What’s Included
- 4 × 3.7m Spring-Loaded Poles
- 1 × Carry Bag
- 2 × Standard Zippers
- 4 × Grip Disc Slide Stoppers (GripDisks™)
- 4 × 2-Piece Non-Skid Head/Plate Attachments
- 1 × 4m x 50m Screening (50 micron)
| Weight | 22 kg |
| Dimensions | 200 × 15 × 35 cm |
| Pole Height Range | 1.4m – 3.7m |
| Number of Poles | 4 |
| Pole Material | Anodised aluminium |
| Screening Size | 4m x 50m |
| Film Thickness | 50 micron |
| Head Type | Non-skid, non-marking, pivoting |
| Base Type | GripDisks™ anti-slip system |
| Setup Method | Spring-loaded (tool-free) |
| Reusability | Yes – heavy-duty repeated use |
Ideal for:
- Construction and renovation projects
- Dust containment during sanding, cutting, or demolition
- Interior fit-outs and refurbishments
- Healthcare, commercial, and residential environments
- Creating sealed work zones or room-within-a-room setups
How to Use
- Extend poles to required height (up to 3.7m)
- Position poles between floor and ceiling
- Attach screening material to the pole heads
- Raise and lock poles into position
- Add zippers for access and seal edges if required
Important Information
- Designed for temporary dust containment only
- Ensure poles are securely positioned before use
- Always check floor and ceiling surfaces are stable
- Follow standard site safety procedures
![]()
Ultimate’s Zip Pole Kit is available for purchase, making it the ideal choice for projects of any duration.
From quick installations to long-term use, our modular system adapts to your needs and budget.
Weekly, monthly, or long-term rates.
Contact us about your project requirements.